


PowerShell switch statements are one of the easiest ways to compare an expression to multiple conditions. It’s kind of like nesting multiple if statements, but much prettier to look at and easier to understand. In this comprehensive guide, we go over the details and look at several examples you can use to spruce up your PowerShell scripts.
Throughout this guide, I’m using PowerShell version 7.4.3 (formerly called PowerShell Core). However, all of the examples we go over should also work for Windows PowerShell version 5.1. If something doesn’t run as expected, try running it in the latest version of PowerShell.
What is a switch statement?
A switch statement in PowerShell is a simplified way to compare a value against multiple possible results, similar to multiple nested if statements. If a condition evaluates to true, any associated action executes.
How to use a switch statement in PowerShell
To use a PowerShell switch statement, you need to build your command with the following components: the switch statement, a test expression, conditional statements to evaluate, and optional actions to take when a condition is met.
Here’s what the basic syntax of a switch statement looks like.
switch (<test-expression>)
{
<result1> {<action1>}
<result2> {<action2>}
<result3> {<action3>}
}
You can see all the necessary switch statement components in this example. We have the switch statement, our test expression surrounded by parentheses, our script block surrounded by braces, and three results with follow-up actions enclosed in braces. This is the basic structure of a switch statement.
Now, let’s look at an actual example of a PowerShell switch statement.
switch ("taco")
{
"pizza" {" If you're reading this, please send me a pizza."}
"ice cream" {"Ice cream is the perfect dessert."}
"taco" {" Tacos should always be consumed in pairs."}
}
This example follows the same structure as the syntax example above. We have the switch statement followed by our test expression “taco” surrounded by parentheses. Next, we have our script block in braces with three potential results and actions. Here’s what happens when we run this PowerShell script.
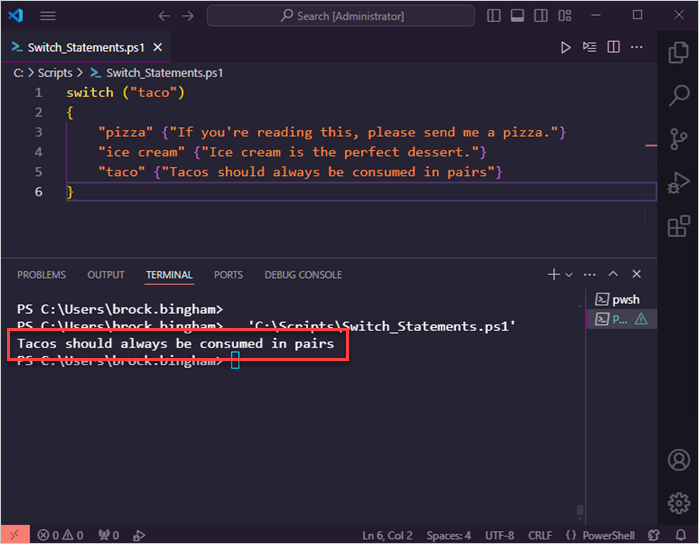
Since our test expression “taco” matches a given condition, the text “Tacos should always be consumed in pairs” returns. If we provide the value “pizza” or “ice cream,” we would return one of the other results. If we provide a value that doesn’t match any of the expected results, the script block would evaluate and eventually skip. And while these examples each contain three conditions, you could include only one condition if you wanted. But hey, we’ve got to use if statements for something, right?
Switch vs. if statements
PowerShell switch and if statements are similar in many ways and are often interchangeable with a few formatting differences and parameters. Even performance results aren’t drastically different (though specific situations and more advanced conditions could return greater performance differences).
The most common factor when choosing between a switch and an if statement with PowerShell comes down to readability. In most cases, if you are evaluating more than two or three conditions, switch statements become much easier to read.
Here’s an example.
$day = (Get-Date).DayOfWeek
if ($day -eq 'Monday') {"Macaroni Monday"}
elseif ($day -eq 'Tuesday') {"Taco Tuesday"}
elseif ($day -eq 'Wednesday') {"Waffle Wednesday"}
elseif ($day -eq 'Thursday') {"Tilapia Thursday"}
elseif ($day -eq 'Friday') {"Falafel Friday"}
elseif ($day -eq 'Saturday') {"Sushi Saturday"}
else {"Schnitzel Sunday"}
This script identifies the current day of the week and returns a menu item depending on the result. You may even recognize this script from my PowerShell if statements article. It’s comprised of several if, elseif, and else statements, which can appear repetitive and convoluted. By comparison, here’s a script that returns the same results but uses a switch statement instead of an if statement.
$day = (Get-Date).DayOfWeek
switch ($day)
{
"Monday" {"Macaroni Monday"}
"Tuesday" {"Taco Tuesday"}
"Wednesday" {"Waffle Wednesday"}
"Thursday" {"Tilapia Thursday"}
"Friday" {"Falafel Friday"}
"Saturday" {"Sushi Saturday"}
"Sunday" {"Schnitzel Sunday"}
}
The switch statement is much more scannable and easier to read. Even though the if statement uses fewer lines, it has to repeat the command and comparison operator throughout the example, making it more difficult to read.
If you’re noticing that all of my script examples involve food, that’s just because I’m always hungry. Don’t judge me — I’m a growing sysadmin.
Using the default clause with switch statements
The default clause is a built-in keyword that determines what to do if no match is found. Instead of returning nothing, the default clause is given an action to perform just like any other value. Here’s an example of using the default clause.
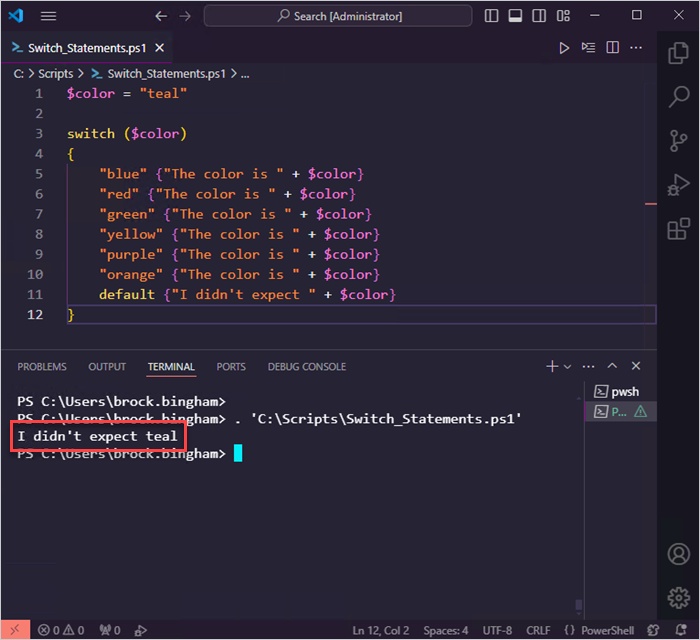
$color = "teal"
switch ($color)
{
"blue" {"The color is " + $color}
"red" {"The color is " + $color}
"green" {"The color is " + $color}
"yellow" {"The color is " + $color}
"purple" {"The color is " + $color}
"orange" {"The color is " + $color}
default {"I didn't expect " + $color}
}
Since the expression “teal” doesn’t match any of the other values, it executes the default action.
PowerShell switch parameters
The PowerShell switch statement includes several parameters to help define expressions and input sources. Here are a list of the available switch parameters directly from Microsoft’s help documentation.
Wildcard: Indicates that the condition is a wildcard string. If the match clause is not a string, the parameter is ignored. The comparison is case-insensitive.
Exact: Indicates that the match clause, if it is a string, must match exactly. If the match clause is not a string, this parameter is ignored. The comparison is case-insensitive.
CaseSensitive: Performs a case-sensitive match. If the match clause is not a string, this parameter is ignored.
File: Takes input from a file rather than a <test-expression>. If multiple File parameters are included, only the last one is used. Each line of the file is read and evaluated by the switch statement. The comparison is case-insensitive.
Regex: Performs regular expression matching of the value to the condition. If the match clause is not a string, this parameter is ignored. The comparison is case-insensitive. The $matches automatic variable is available for use within the matching statement block.
PowerShell power user?
Check out The PowerShell Podcast: a weekly exploration of tips and tricks to help you step up your PowerShell game.
How to use multiple expressions in a switch statement
Switch statements can evaluate multiple expressions in the same statement. This can be in the form of an array, multiple variables, integers, strings, etc.
When submitting multiple expressions, separate them with a comma. Multiple expressions are evaluated in the order they are written.
switch ("a","b","d")
{
"a" {"it's a"}
"b" {"it's b"}
"c" {"it's c"}
}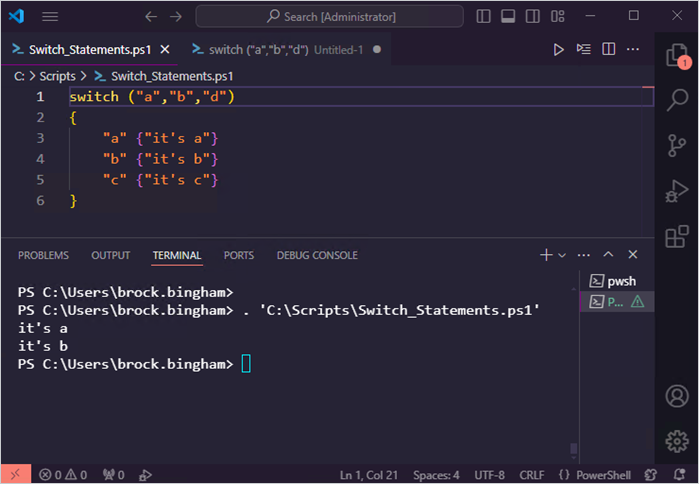
Here we evaluate the letters “a,” “b,” and “d.” Both “a” and “b” return true, but “d” doesn’t match any of the conditions.
PowerShell switch break vs. continue
By default, switch statement expressions are tested against each value in the script block. This could result in an expression matching more than one value. Here’s an example where an expression matches more than once.
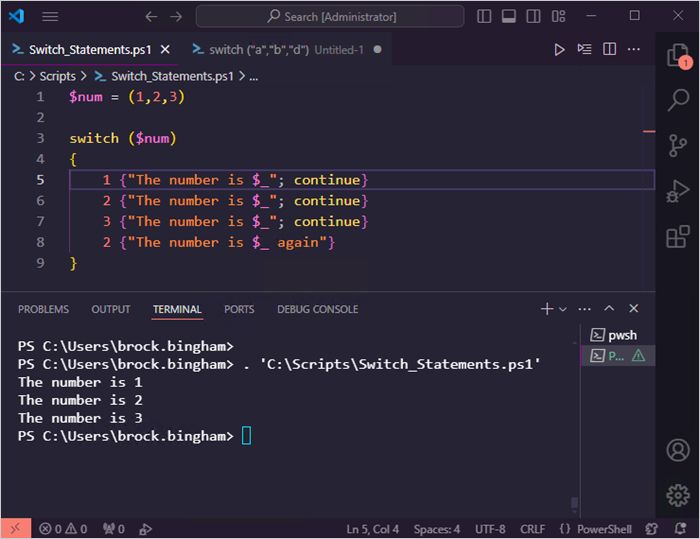
$num = (1,2,3)
switch ($num)
{
1 {"The number is 1"}
2 {"The number is 2"}
3 {"The number is 3"}
2 {"The number is 2 again"}
}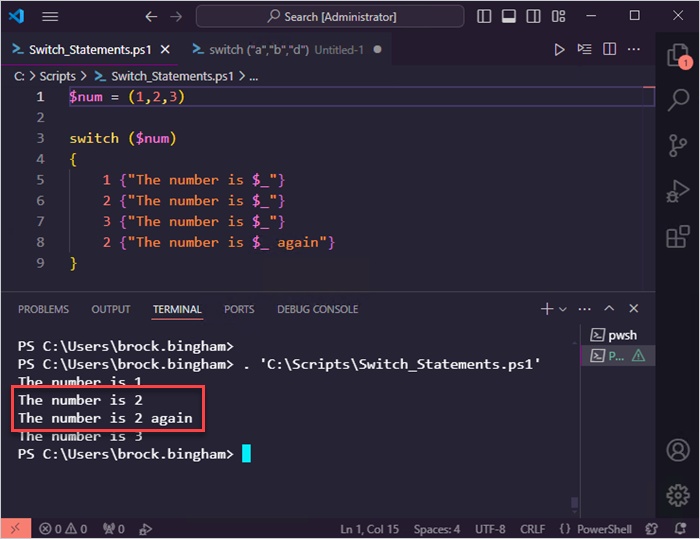
If you don’t want an expression to match more than once, you can either use the continue or break statement. A continue statement stops evaluating the current expression once a match is found; however, it proceeds to evaluate the next expression if there is one available.
In this example, we use the continue statement to limit each expression to match only one condition. Once the second condition evaluates and matches 2, the switch statement moves onto the next value in the variable, eliminating duplicate matches. Here is the result.
If you want to stop the entire switch once a specific condition is met, use the break statement. Here’s what happens if I replace the continue statement with a break statement in the same example.
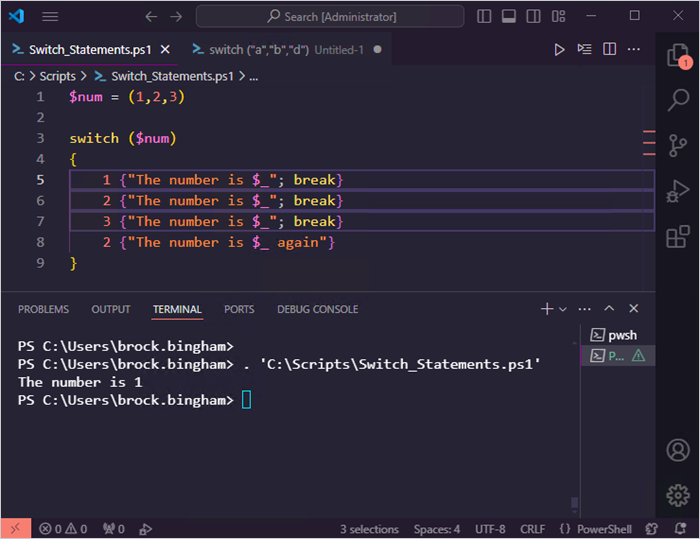
The break statement stops the switch from evaluating anything after the first condition returns true.
Switch statement examples
What’s that? You’re still here and you want more PowerShell switch statement examples? Well, as any good rock star concedes to their adoring fans chanting encore, I guess I could muster up a couple more examples to keep my fans happy.
These examples include a couple new skills that we haven’t already covered, like using script blocks as conditions and including switch statement parameters.
Using switch statements to identify running processes
This PowerShell switch statement example uses a script block condition to determine if specific processes are running.
$process = "Chrome", "Notepad++", "Firefox"
switch ($process)
{
{Get-Process $_} {Write-Host -ForegroundColor Green "$_ is running"}
default {Write-Host -ForegroundColor Yellow "$_ is NOT running"}
}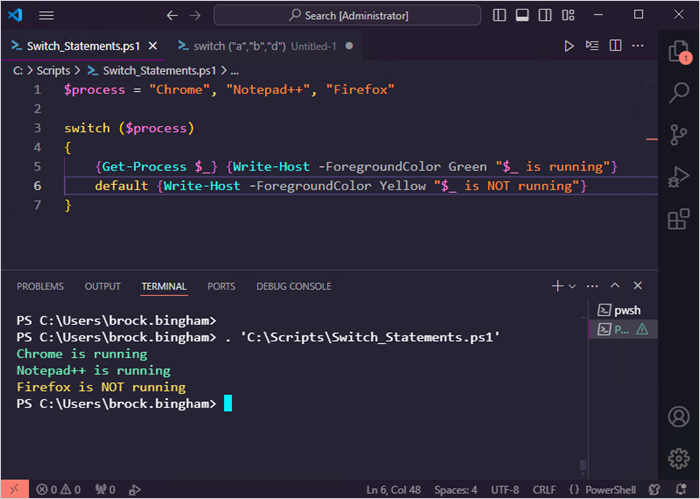
In this example, we use a script block and the Get-Process PowerShell cmdlet to retrieve running processes, followed by the built-in $PSItem variable (alias $_) to pass the name of the process from the $process variable. The script iterates through each item in the variable and returns a message if the process is running or not. If the process is running, a green color is applied to the font. If it’s not running, a yellow color is applied.
Counting files by file type with the PowerShell switch statement
In this example, the PowerShell script returns the number of specific file types found in a given directory.
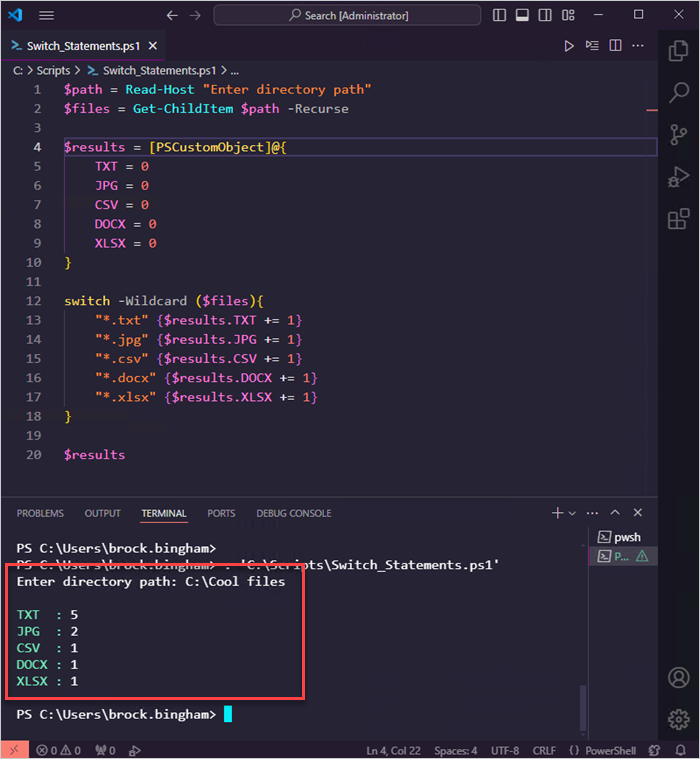
$path = Read-Host "Enter directory path"
$files = Get-ChildItem $path -Recurse
$results = [pscustomobject]@{
TXT = 0
JPG = 0
CSV = 0
DOCX = 0
XLSX = 0
}
switch -Wildcard ($files){
"*.txt" {$results.TXT += 1}
"*.jpg" {$results.JPG += 1}
"*.csv" {$results.CSV += 1}
"*.docx" {$results.DOCX += 1}
"*.xlsx" {$results.XLSX += 1}
}
$results
This script first requests that users input a directory path, then uses the Get-ChildItem command with the -Recurse parameter to return all the files found to the $files variable. Next, we use PSCustomObject to create a new object that contains the sums of each specific file type listed. We then use the switch statement with the -Wildcard parameter and the $files variable as our test expression. Our switch statement contains various file type conditions preceded by a * wildcard. When a file condition is met, the value of the matching custom object property increases by one. Lastly, we use the variable assigned to our custom object to display the results.
Here are the results when I run this script in my test environment.
You can easily add more document types to this script to meet your needs. Also, consider adding a default condition for files with no matching file type listed.
Get-Help about_switch info
Finding the help documentation for switch statements can be a bit tricky since they don’t follow the same verb-noun naming scheme as most other cmdlets. If you want to pull up the switch statement help file, enter the PowerShell command Get-Help about_switch.
Hopefully this guide helps you add to your PowerShell repertoire. If you’re interested in more PowerShell basics, definitely check out our guide on PowerShell loops. And if you’re still stuck using the command line, it’s not too late. We have tons of articles that teach you the PowerShell equivalents of your favorite cmd commands, like our PowerShell equivalent of dsquery article.
Lastly, if you need help running scripts against your managed devices, check out PDQ Connect or PDQ Deploy & Inventory. Connect is an agent-based solution that makes local and remote device management easy. Deploy & Inventory specialize in on-prem device management and don’t require an agent installation.


